Ergonomic Computer Workstations – Equipment and Setup Guide
Quick Setup Guide :
STEP 1: Your Chair
A proper ergonomic chair is crucial to any ergonomic workstation. If you need to find yourself a good chair, we have reviewed the best ergonomic chairs on the market in 2017, and included an extensive buying guide as well. Here are a few tips for after you’ve picked a chair that works well for you:
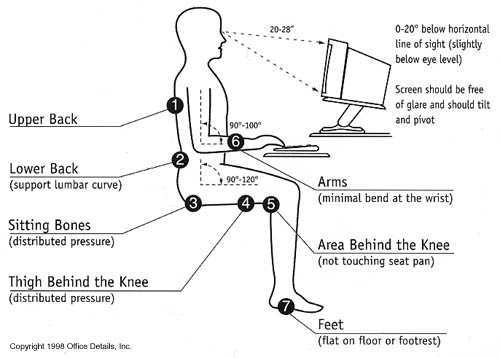
Setup for Correct Posture
STEP 2: Your Keyboard
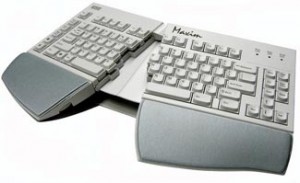
Example of a properly ergonomic keyboard.
- The user should pull himself/herself close to the keyboard.
- The keyboard should be positioned directly in front of the user’s body .
- The keyboard and desk height needs to be adjusted so that the shoulders are relaxed, elbows are in a slightly open position (100° to 110°), and the wrists and hands are straight.
- The tilt of the keyboard is dependent upon the sitting position of the user. Use the keyboard tray mechanism, or keyboard feet, to adjust the tilt. While sitting in a forward or upright position, the user should try to tilt it away from him/her at a negative angle. If the user is reclined, a slight positive tilt will help maintain a straight wrist position.
- Wrist rests are excellent in helping to maintain neutral postures and pad hard surfaces. However, the wrist rest should only be used to rest the palms of the hands between keystrokes. It is not recommended to rest the palms on the wrist rest while typing. Avoid using excessively wide wrist rests, or wrist rests that are higher than the space bar of your keyboard because it might cause strain.
- Place the pointer as close as possible to the keyboard. Placing it on a slightly inclined surface, or using it on a mouse bridge placed over the 10-keypad, can help to bring it closer.
If you do not have a fully adjustable Ergonomic Keyboard Tray, you may need to adjust your workstation height, the height of your chair, or use a seat cushion to get in a comfortable position. Remember to use a footrest if your feet hang down .
STEP 3: Monitor, Desk, and Phone
If the screen and source documents are not positioned correctly, it may force the user to work in awkward postures. These need to be adjusted so that your neck is in a neutral, relaxed position. Try the following:
- Place the monitor directly in front of you.
- Position the top of the monitor approximately 2-3” above seated eye level (if you wear bi-focals, adjust for a comfortable reading level).
- The distance from the screen should be at least an arm’s length away and then the distance from your vision is to be adjusted.
- Reduce glare by careful positioning of the screen.
- Place screen at right angles to windows
- Adjust curtains or blinds as needed
- Adjust the vertical screen angle and screen controls to minimize glare from overhead lights
- Other techniques to reduce glare include use of optical glass glare filters, light filters, or secondary task lights
- Position source documents directly in front of you using an in-line copy stand. If the space is not enough, place source documents on a document holder positioned adjacent to the monitor.
- Place your telephone within easy reach.
- Use headsets and speakerphone to eliminate cradling the handset.